Wednesday, July 22, 2015

Timing belt removal, on Toyota Starlet EP91

Disclaimer!
This is not recommended for beginners! Don´t do it if you don´t have the knowledge, OK?! DON'T BLAIM ME if you fail. Doing it wrong can damage your engine.. In this post I just tell you what I did OK?

Enough of disclaimer, everyone has to take their own responsible for their life and the choices they do..

Ok, lets get started!

First! Jack up the car, Remove front right wheel.

Then remove splashguard under the car, the right one, 4 bolts on my car and clip holding it together with the left splash guard.

I suggest you start with the crankshaft pulley, if you can get that one off is the main question. This how I did it.

Remove the 19 mm crank pulley bolt.

If you are mad enough to try the startengine method....

Remove the 15A EFI fuse before cranking, I missed this so the engine started. But fortunatly I stopped it before anything bad happend...Phew. Dont miss this.. Be careful and dont do it if you dont know how. Se pictures down below for how I did it.

Alternator Belt /  Drive belt. 
Loosen Pivot bolt and then loosen adjusting bolt and move the alternator so you can slide /get the alternator/ drive belt of.

Picture from: http://www.toyotagtturbo.com/forums/showthread.php?94745-how-to-change-fan-belt-on-starlet-na
Suggest you mark up the adjusting bolt and feel the tension of the belt so you can get it back the same when finished.


This tool can help remove crankshaft pulley. Credit to Peter Finn! Is called Takjärn in Sweden.

27.45 in the video: https://www.youtube.com/watch?v=36VfojkWhm8


76069 km, and 18 year old car, time to change the belt.
Date of the job, 2015-07-20, 76069 km, and 18 year old car, time to change the belt. Every 6 year or 90000 km whichever comes first.

After removing the wheel and splash-guard: First thing, loosen this 19 mm bolt. My first approach was too try to hold the crankshaft pulley with M8 screws and a bar, but had a hard time drilling trough the bar.. so...
After removing the wheel and splash-guard: First thing, loosen this 19 mm bolt. My first approach was too try to hold the crankshaft pulley with M8 screws and a bar, but had a hard time drilling trough the bar.. so... 

I decided to go with the start-engine and turn the ignition key a short moment method. It felt like high risk but I did try it and was successful. I put the socket wrench against the frame, as you can see in the picture.

Next I loosen the Alternator Pivot bolt and the adjuster bolt so I could remove the drivebelt.

Got the crankshaft pulley of easy, thanks for that! It wasn´t stuck. YES! This was the biggest challenge to get of, and it went like a breeze.

4E-FE engine. Here you have the crankshaft pulley and drivebelt removed. Time to remove the two plastic cover.

Here I have removed the upper cover. 4 screw of 10 mm bolts if I remember correctly.

The lower cover had 3 bolts, 10 mm socket wrench. Here it just coming of.

Toyota Starlet, 4efe: Now the cambelt is fully visible.

Checking out the alignment of the original belt.

View, from the bottom of the engine. Crankshaft teeth at the lowest point.

Tried to but the crankshaft pulley back so I could rotate the engine, clockwise. But was to heave, had to put the wheel back on and put the gear in 4th gear, then It was pretty easy to turn the engine around by hand.

Tensioner pulley with spring, I put some marks here, thought it might be useful, but really wasn't. This one has to be moved. To get the cam belt of, the tensioner wheel has to be moved as far left as possible. The spring will be longer. And then tighten the bolt, (12 mm)

Clean everything that was dirty, here the Idle pulley.

Checking TDC, top dead center. on the cam. The 4E and the little hole must align. So must also the crankshaft teeth / cogwheel.

I decided to go for a Gates Powergrip cam belt.

Checking that the crankshaft mart is where it should be according to TDC. Last picture before changing the belt.

I got the belt of, bit by bit. And then check the tensioner bearing and idle pulley bearing. Felt good and solid. Don´t have to change them.

Here the new belt has been mounted. Took a while to get the new cam belt on, it was pretty tight even though I´ve moved the tensioner pulley. But finally got it on and then turn the camshaft cogwheel 2 whole turns and checked if the marks lined up as they should. When I was sure they were correctly installed I tried starting the engine and it the sound was OK. YES! I then re-assembled everything in reverse order.
Here the new belt has been mounted. Took a while to get the new cam belt on, it was pretty tight even though I´ve moved the tensioner pulley. But finally got it on and then turn the camshaft cogwheel 2 whole turns and checked if the marks lined up as they should. When I was sure they were correctly installed I tried starting the engine and it the sound was OK. YES! I then re-assembled everything in reverse order.

Finally I put this little sticker that was in the Gates cardbord case. Noting the km and date so that next owner has a clue of the status of the cam belt. The least I could do..

Another guide of how to do it:
http://www.ukstarletowners.com/topic/3169-how-to-change-a-cambelt-ep91


Tercel video, same principle as the Toyota Starlet, even though not the same engine.

https://www.youtube.com/watch?v=bf93v-d3Kdc

I´ve done a video, 2 part series, check it out!

Part1 /2

Part 2/2


The car is now running fine and everything is like it should! YES!

Bye! :-)

Tuesday, July 21, 2015

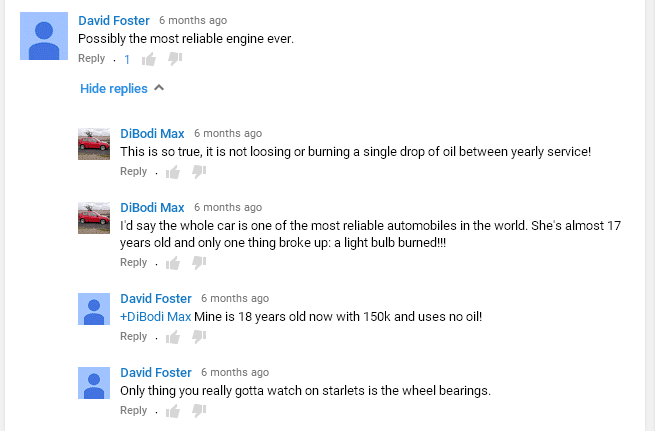
Possibly the most reliable engine ever


Possibly the most reliable engine ever.. The Toyota Starlet 4E-FE. :-)

Just found these comments. Apperently we might watch our wheel bearings.


Source: https://www.youtube.com/watch?v=kiIu-X1rvJs

Ordering Cambelt and Oilfilter for the Toyota Starlet 4E-FE

Time to order some replacement parts.
First: Service interval, replacing fluids and so on.

From Toyota Corolla E11 manual

From Corolla E11 manual, same engine 4efe as in Starlet.

Oilfilters. Bosch is probably best but its a bit expensive and I think this will do..
From Biltema, I just dont want there logo so....

I ordered it from skruvat.se instead.

Cambelt Gates 5358XS

Comparing partnumber from Toyota original.

Gates belt seem good enough, know many who has them, and hasnt complain.


Picture of Starlet Oil Filter, I think this is for the Turbo

My order..  Shipping only 29 kr, not much.


If I would have bought the belt from the firm Mekonomen it would have cost about 500 SEK. And they didn't have it in there shop so I ordered online instead..


----------------------  -----------
[EDIT 2018-04-24]
Just bought another oil filter for the Starlet ..

I decided to go for a one with anti-drain-valve, also known as non return valve (Backspärrventil / Backventil in Swedish). This keeps the oil in the oilchannels when the Engine is turned off, so there should be more oil availble when restarting the Engine. = Less friction when starting = better.

This is the one I bought from Skruvat.se:
WIX WL7131


Wednesday, July 15, 2015

Charging the car battery with a Ctek

The battery in my car is going bad slowly. I use a CTEK charger to amp up the power in the battery from time to time..
The Biltema lead battery is going sour on me. When the car not have on the road for a couple of days, the start engine is slow in the beginning.

I use this CTEK Charger M100 and are happy with it.

The battery size is Biltema 44 A. LxBxH = 207,5x175x200 mm  and there seem to room for a bigger battery, I don't know what the original one is for a Toyota Starlet. Anyone know?

This M100 charger has an output of 7A so it charges a battery in a say 5-6 hours depending on how low the charge of the battery is. Its for lead batteries.

The charger adapts and has different kind of "steps". Here the battery is ready. Green light.

A nice feature of the CTEK is that you can change contacts if you want. Different sort can be bought.


Thursday, July 9, 2015

Toyota Starlet goes 600.000 km / 372822miles

Found this Youtube video from Iraklis Pouaro of a Toyota Starlet Ep91 turning 600.000 km on its odometer, This trustworthy car just will run and run.

The description of the video says:
"My toyota starlet ep 91 has now 600.000 km without having a problem at all of its life"
Many miles on a Toyota Starlet Ep91. One of the most reliable cars ever made?
600.000 km, that's equal to 372822 miles
Many miles on a Toyota Starlet Ep91. One of the most reliable cars ever made? (overall that it)
Reliability Rating = HIGH!


Does your Toyota Starlet have high mileage? Please comment if you think its been reliable. :-)

Mine sure has.

Friday, June 5, 2015

Thursday, May 28, 2015

Videos: Changing timing belt in a Starlet EP91

Found this interresting videos from a guy (Peter Anderson) fixing with his Starlets. Interesting stuff if you like cars. Peter speaks good about Toyota and how ingeniously they did these cars. He thinks they are very easy to work on.

BUT if you are looking for timing belt instructions I've made a newer better post. Check it out here.


Power Steering and Timing belt change


Cleaning chairs, removing the fabric.

Restoring an other Toyota Starlet Ep91 with a donor.


Another link showing timing belt change on the 4e series.

http://mearcatmini.blogspot.se/2010/07/4e-timing-belt-change.html


Easy way to remove a stubborn crankshaft pulley bolt


"Note that the pulley has four holes. Two of the holes are threaded and the other two holes are not. I had to rotate the crank shaft (via the pulley bolt) to gain access to the threaded holes in order to use the club."
Source: http://www.toyotanation.com/forum/103-3rd-4th-generation-1992-1996-1997-2001/264425-diy-gen3-timing-belt-waterpump-oil-seal-change-part-1-a.html

Friday, September 26, 2014

Remove front bumper on Starlet

I got an email, asking about the front bumper and headlight. If you need to remove the front bumper in order to remove passenger headlight. Thought I could publish a picture of it.

"Glad, you still have the Starlet and that the Oil change worked for you. I´m very pleased with mine. No problems, just runs fine.
I really don't know about the headlight. But I have removed the front bumper, and it was not a big thing. Other cars I have removed the bumper to get the headlight removed, but don't know if it could be done with it in place on the Starlet..
Pretty easy to remove the bumper.. Isn't it some differences between Glanza headlight and a regular Starlet? Perhaps that is why you get different information from the UK-site and the Australian?"

Here are the screws you need to remove:

Screws you need to remove, Front bumber. Toyota Starlet
Here are the screws you need to remove, to get the Front bumper from the car.

Tail light

Good luck! :-)

Sunday, August 31, 2014

Rust on Starlets?

Rust is not that very common fortunately.

But I managed to find one that had some clearly noticeable rust.

Boot cover, pretty common, must have been something wrong from the start.

Rust on: Front lower beam, Doors, and rear wheelhouse
I have also heard that the upperside (topside?) of the fuel-tank is common to rust. You cant normally see this.

Rear brakelines I think is common. The inspector took a knife to try to find on my car, he did not find any rust. #Rust treatment

Sunday, August 24, 2014

Does a Thule Micra K11 roofrack fit on the Starlet?

No, it does not fit! Unfortunately.


A long time ago I had a Nissan Micra year 2000, and I have kept the roof-rack for that car, a Thule Rapid System. Hoping that it would fit my next car.. I always like Thule, they are from Sweden and make great roof racks. Expensive though.

This is what the Nissan Micra K11 kit is made of:

Rapid System 750 Foot Pack

KIT 1108 that fit Nissan Micra 3/5 door, 93-

The bar is:
Thule SquareBar 760, max load 100 kg, but the rest only good for 75 kg. The length is 108 cm which is to short. The Starlet needs the 761 serie, that is 120 cm.

Here are some pictures of the kit:

Thule 760 squarebar, it rapid system 750 footpack
Here you see the Thule 760 squarebar, it rapid system 750 footpack, and the 1108 kit for the door.

Thule kit 1108, these thing is for the 3 door variant, I had the 5-door variant.

Manual for the kit 1108 and Nissan Micra K11 (93-2002)
Parts that is needed, here you see the Thule 761 version that is for the Toyota Starlet EP91

squarebar Thule 760
Close up on the square bar Thule 760, which is 108 cm in length, to short for the Starlet.

This roof rack is for sale. If you buy the bars only on Mekonomen they cost 889 Swedish crones. Give me a decent offer and it´s yours. I´m also interested in changing the Thule squarebar 760 to an 761. Or if you have a Thule Toyota Starlet kit I can happily switch.


My Toyota Starlet 96- 3 door need:

Thule 1041 Rapid Fitting Kit  (399 kr on Mekonomen here i Sweden)

Thule SquareBar 761  = 120 cm (they cost 449 per unit, that is 889 for two)

And I think the 3-door version needs an:

SRA 774 (SRA = Short Roof Adaptor )

Foot Pack 750 or 754, I have the older 750 style. (dont need to buy)

There is nothing to attach the rear bar else, I guess?


Any opions?

Friday, August 1, 2014

Officiella tjänstevikten och bilskatten är för hög mot verkligheten..

Hej,
Tänkte uppdatera er på hur det går med bilskatten. Idag har jag mailat skatteverket och hoppas på att dom kan hjälpa mig.

Idag har jag äntligen tagit mig till bilprovningen för att dels väga bilen och även besikta bilen. Mycket riktigt väger min bil mindre än dom officiella siffrorna som transportstyrelsen har. Det är inte transportstyrelsens fel då Toyota uppenbarligen rapporterat fel siffror.. Jag har kontaktat Toyotas generalagent i Sverige och har tyvärr blivit avfärdad. Se tidigare inlägg här och här.

Följande gäller för min bil och vid vägningstillfället:

Alla vätskor är som dom ska. Olja, bromsolja, hydralolja till koppling, växelådsolja, allt är korrekt ifyllt. korrekt. Spolarvätskan uppfylld till max. Bilen fulltankad och körd en mil sedan tankning.

I övrigt har bilen rostskyddats dels av rostskyddsföretag (Börjes Rostskydd, bästa sorten, dvs allt är rostskyddsbehandlat), samt även en exta gång av mig med både linolja och bitiumbaserad rostskyddsmassa. Väger säkert 6-10 kilo bara detta.

Bilen har såklart all inredning, säten och reservhjul precis som standard. Ingenting urplockat för att ge fina siffror! Snarare har det tillkommit vikter sedan den var ny.

Har dessutom dragit extra tjocka strömkablar för ett slutsteg i bilen. Väger uppskattningsvis några extra kilon.

Handsfacket var fullt av bråte och "bra att ha saker". Extra bagagerumsmatta.

Ryggsäck med diverse prylar låg i bilen vid fototillfället. Innehöll bland annat verktyg utifall något snabbt behövdes fixas i samband med bilbesiktning som gjordes strax efter vägning.

Förarsätet även belagd med överdragsskydd.

Så en hel del extravikt förutom om den står som rent med tjänstevikt.

Ändå väger bilen 40 kilo mindre inkl mig som förare (väger 78-80 kg) än dom officiella siffrorna (1020 kg).

Utan mig sittandes i bilen väger bilen 900 kg.

Med mig sittandes i bilen visade mättavlan 980 kg.

Testade att ställa bilen på olika ställen på vågen, men det gav ingen skillnad på mätvärde. Fick samma värde var jag än stod med bilen på plattan.

Följande är bildbevis tagna några minuter innan bilbesiktning. Datum 2014-08-01. Det går att kolla att mätarställning på bilen matchar fotot med besiktningsprotokoll. dvs bevis på att vägning och bilprovning skedde vid samma tillfälle.

Toyota Starlet som utan någon person i bilen väger 900 kg enlig bilprovningen våg.
Här syns vågplattan. Spelade ingen var jag stod på denna platta. Vägningen visade samma resultat ändå. Som synes ger mätvärdet ett resultat av 900 kg. Bilen fulltankad och alla vätskor som dom ska, spolvätskan maxfylld. All inredning på plats, reservhjul på plats etc. Plus lite extra prylar som ligger och skräpar och knappast gör att bilen väger mindre. :) 

Ytterligare en bild med samma resultat, 900 kg. Ingen sitter i bilen.

Detta är den korrekta tjänstevikten, 980 kg, inkl mig på 78-80 kg och alla vätskor maxfyllda.
Här har jag hoppat in i bilen. Jag väger runt 78-80 kg. Vågen visar nu 980 kg. 40 kg mindre än dom officiella som transportsstyrelsen har. Jag får alltså betala mer bilskatt än jag borde eftersom tjänstevikt är med i beräkning av fordonsskatt så vitt jag förstår. Jag börjar tyvärr även ifrågasätta om dom andra siffrorna som Toyota lämnat  verkligen stämmer..

Här syns att bilen är fulltankad. Den står här på vågen. Bilen har körts 10 kilometer sedan fulltankning. Mätarställning 74687 km stämmer med bilprovningen besiktningsprotokoll som gjordes ca 5 minuter efter att denna bild togs. Datum 2014-08-01

Besiktningsprotokoll: Här syns vägmätarställning som bekräftar bilden ovan. 
Givetvis ställer jag upp på en ny oberonede mätning om skatteverket och transportstyrelsen inte tror på mina bilder.